
Compare two revisions
Design Comparison shows what changed between two commits of a project. It lists each change as a reviewable item, shows it on the schematic or board, and lets you discuss it, so you can review a design change the way you review code.
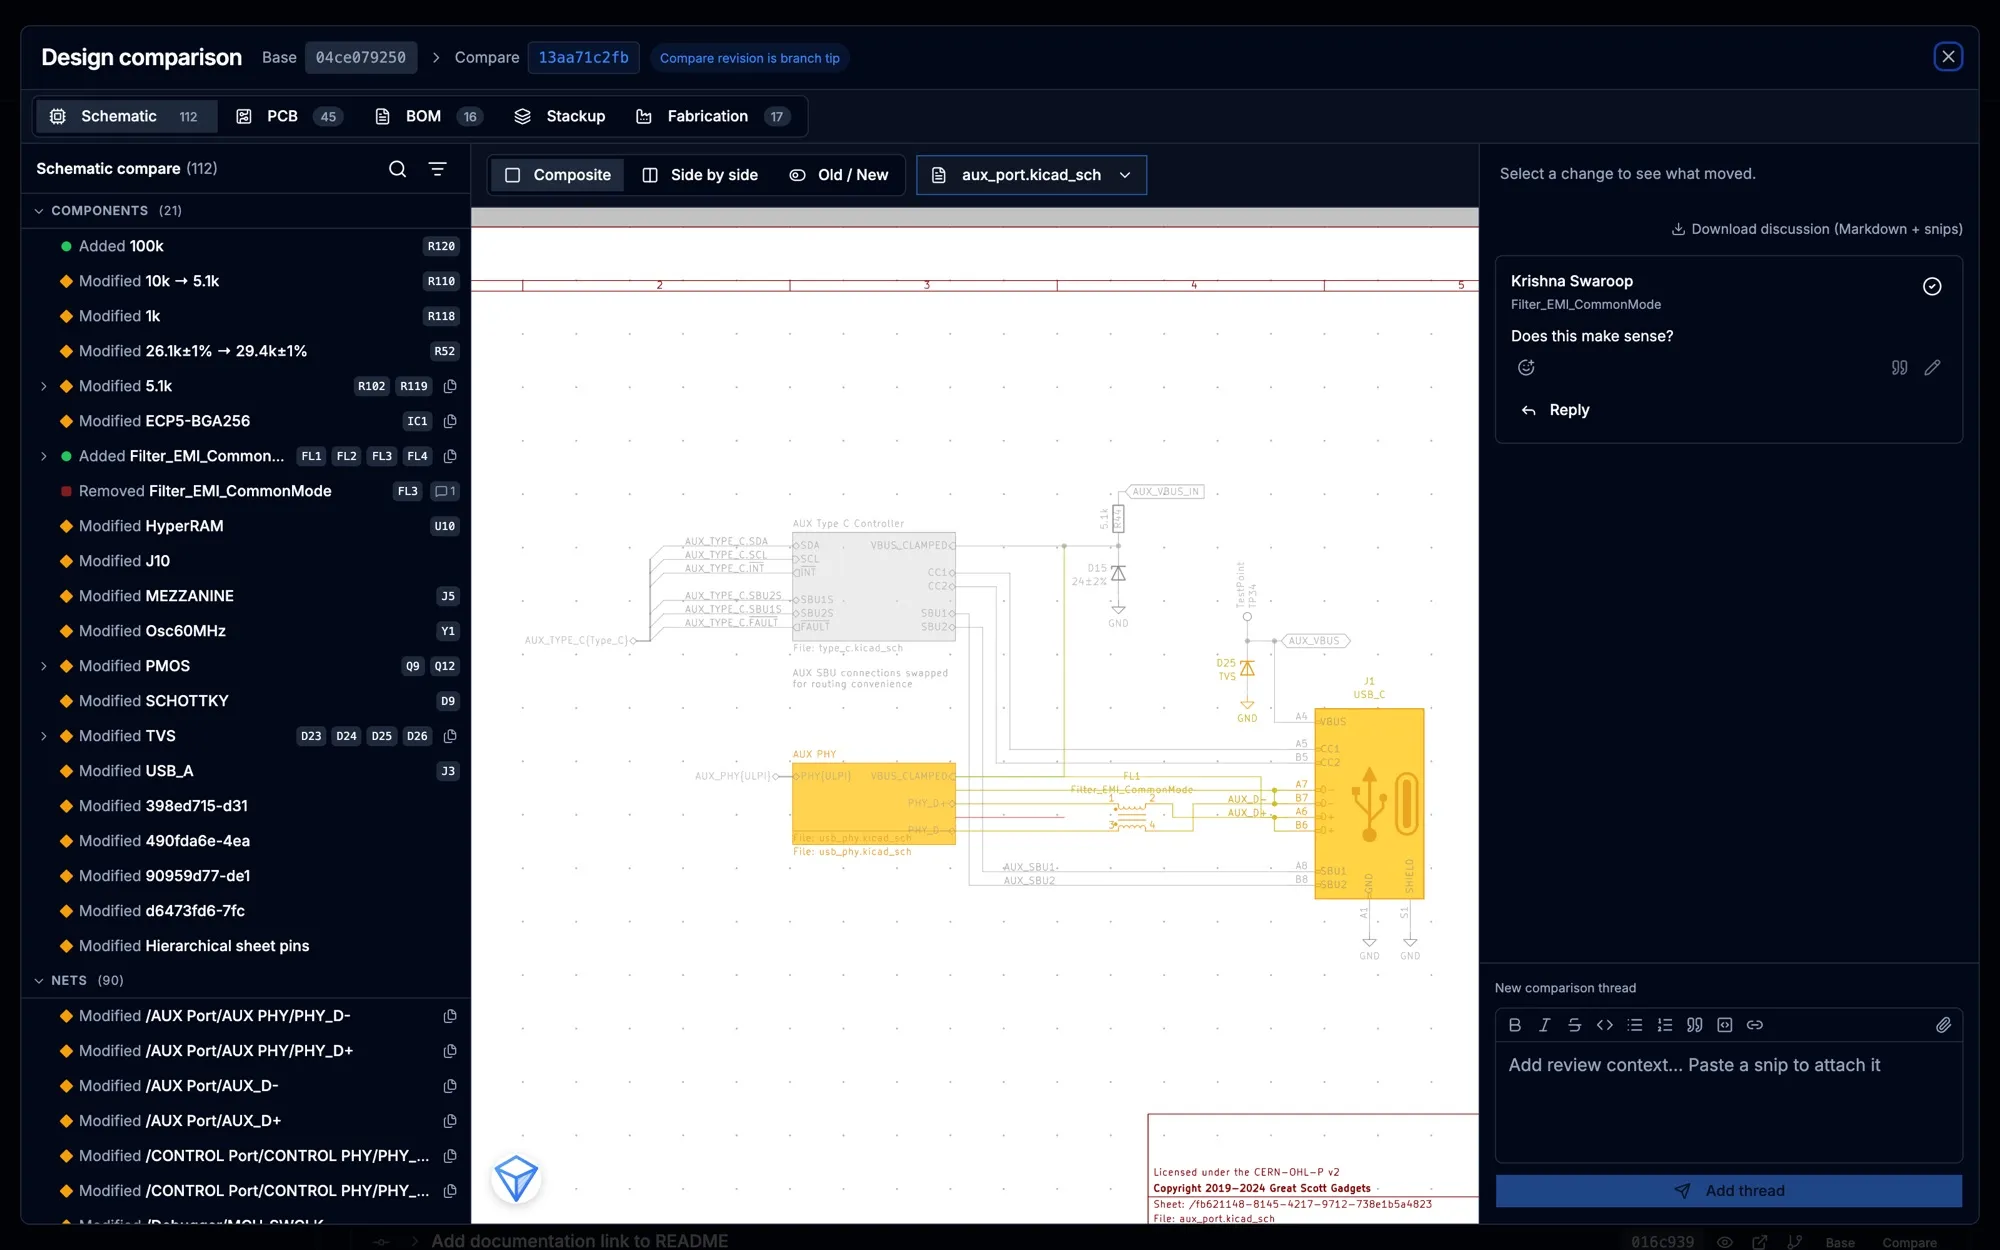
Design Comparison reports what changed. It does not tell you whether a change is electrically correct, manufacturable or approved.
Open a comparison
Section titled “Open a comparison”- Open the project and select History.
- On the older commit or release, select Base.
- On the newer one, select Compare.
- In the bar at the bottom, check the two revisions. Swap exchanges them; the × clears the choice.
- Select Open comparison.
Base is the reference and Compare is the candidate: Added means present only in Compare, Removed means present only in Base, and Modified means present in both but different. Swapping the two reverses every change.
The window opens on the Schematic tab. Its header shows both commits, and a badge when one of them is the tip of the branch. Both sides stay on the exact commits you picked, even if the branch moves while you review.
Prism prepares the comparison in the background. When both revisions already have their design data, this takes a few seconds. A revision without design data is read from its files first, which takes longer on a large board, and the Fabrication tab runs KiCad to plot both revisions, which also takes longer.
Pick a domain
Section titled “Pick a domain”The tabs across the top each show their number of changes:
| Tab | What it compares |
|---|---|
| Schematic | Symbols, fields, pins, connectivity, nets, hierarchy, buses and text |
| PCB | Footprints, pads, tracks, vias, zones, layers, board graphics, net assignment and rules |
| BOM | Added, removed and changed part rows, quantities, references, DNP and BOM flags, and part fields |
| Stackup | Layer materials, thicknesses, copper, dielectric and finish |
| Fabrication | The Gerber and drill output of both revisions, layer by layer |
BOM and Stackup show their changes as tables. If one domain fails to compare, its tab says so and the other tabs still work.
Work through the review queue
Section titled “Work through the review queue”The left panel on the Schematic and PCB tabs is the review queue. Each row is one design decision, such as a part change with its symbol, footprint and BOM evidence, a net rename, or one rerouted connection with all its segments and vias. The queue is grouped into Components, Nets, Rules & constraints and Layout & documentation.
- Click a row to select it. The canvas shows every object the change touches, and the right panel explains it. Hovering a row only previews it.
- Expand a row to narrow the selection to one reference, one connection or one sheet. Selecting a reference chip shows only that instance.
- The search icon (Search changes) filters the queue by change, net or reference.
- The filter icon (Filter changes) filters by status (Added, Removed, Modified) and by review owner (Mechanical, PCB fabrication, Electrical, Assembly / BOM, Rules / constraints, Documentation).
- Show layout and documentation adds the secondary changes, such as moved text and graphics, which are hidden by default.
The counts on each group are taken before search and filters, so they do not change as you filter. A selected row stays selected even if a filter hides it.
Changes that KiCad makes on its own, such as zone refills, page renumbering, regenerated identifiers or automatic net names, are not listed as separate changes.
Choose how to show a change
Section titled “Choose how to show a change”The buttons above the canvas set the presentation:
- Composite draws both revisions on one canvas, with additions and removals marked in the surrounding design.
- Side by side shows Base and Compare next to each other, with zoom and pan kept in step.
- Old / New shows one revision at full width. Use Old and New to switch between them.
When you select a change, Prism picks the presentation that shows it best, and highlights that button. For example:
- an added or removed part or wire: Composite;
- a moved, rotated or re-routed object, a pin, power symbol, bus, sheet, net rename, or any copper change: Side by side;
- a value or field edit, text and documentation, rules and net classes: Old / New.
When a row holds several changes, the strongest need wins: Side by side, then Old / New, then Composite. Click another button to override the choice for the current change; selecting the next change goes back to Prism’s choice. The Fabrication tab starts in Side by side.
Read the change details
Section titled “Read the change details”The right panel describes the selected change:
- Properties: status, review owner, affected references, and DNP and BOM state per reference.
- Changes: each property’s old and new value.
- Connectivity: pins added to or removed from a net.
- Layers used: the board layers the change is on.
- Context: the document and category.
- Comments: the discussion on this change.
Two notes can appear instead of a highlight on the canvas. Structured evidence only means the change has nothing to draw, such as a rule or a net class; read its values in the panel. No canvas target resolved means the change should have an object on the canvas but Prism could not find it; review the values below it.
Board layers during a comparison
Section titled “Board layers during a comparison”On the PCB tab, selecting a change shows only the layers that change is on,
separately for each revision, plus Edge.Cuts for the board outline. A change
on a front-side technical layer, such as silkscreen or paste, also shows
F.Cu, and a back-side one shows B.Cu.
The focus stays while you work on that change. Changing layer visibility yourself releases it for that change; selecting another change applies its own focus, and clearing the selection restores the layers you had before.
Discuss a change
Section titled “Discuss a change”The panel on the right holds the comparison’s discussion. Threads here are tied to the two revisions being compared, and to the change, reference or connection you had selected when you wrote them.
- Select the change.
- Write in New comparison thread. Paste a snip to attach it.
- Select Add thread.
Replies, reactions, resolving and publishing as an issue work as in Review with comments. Download discussion (Markdown + snips) saves the whole discussion with its images.
Share and export the review
Section titled “Share and export the review”- Share. The URL records both revisions, the tab, the selected change, whether secondary changes are shown, any presentation you chose, and the board layers you set. Copy it to send someone the same view; the browser’s back and forward buttons step through your review.
- Export. Export review queue downloads the queue as CSV. It contains the rows your filters show, not the whole comparison.